
NSX Build Lab now has a security section: the Distributed Firewall, the Gateway Firewall and IDS/IPS, all simulated in the browser. You can send normal traffic or an attack through the lab and see exactly which checkpoint allows it, raises an alert or drops it.
Everything from the first version works as before. You still build NSX the way the NSX Manager asks for it: transport zones, host preparation, segments, Tier-1, edges, Tier-0 and BGP. Overlay, routing, route tables and edge failover behave exactly as they did. The security steps are optional: do them, skip them, or start from the Completed example.
The lab is still for two kinds of people. Those who want to understand how NSX really works but have no lab of their own. And those who need to explain it quickly to a customer, a manager or a new colleague: share your screen, break one setting, and the cause is right there.
Try it at https://vconfig.pl/nsxlab
What’s new: Security · vDefend
A new Security · vDefend group in the left menu holds six pages, and the guided build gets five more steps (13 to 17). Each page follows the order and the rules of the VMware vDefend 9.1 documentation.
| Page | What you do there | What the lab enforces |
|---|---|---|
| Distributed Firewall | Turn on the global DFW switch, then the DFW for cluster-01, and write rules | Rules are checked top-down, first match wins, enforced at every VM’s vNIC. The cluster switch needs prepared hosts. |
| Gateway Firewall | Turn it on per gateway and write rules in Emergency, Pre Rules or Gateway Specific | It runs in the gateway’s SR on the edges. A Tier-1 that runs only as a DR has no SR, so its switch is greyed out. |
| IDS/IPS Settings | Turn on IDS/IPS for cluster-01 and for gateways | Needs the DFW on the cluster (or the Gateway Firewall on the gateway). Not on Small edges. ESX 9.1 hosts run Turbo Mode. |
| IDS/IPS Profiles | Pick severities: Critical, High, Medium, Low, Suspicious | Only signatures of the selected severities raise anything. |
| IDS/IPS Rules | Pick traffic, a profile and an action: Detect, Detect and Prevent, or Exempt | Top-down, first match wins. Exempt (new in 9.1) is for distributed rules only. |
| IDS/IPS Events | Read the alerts and drops your tests produced | Filled automatically when you test an attack. |
Two rules from the documentation are worth knowing before you start:
- The order is fixed. IDS/IPS can’t be turned on for a cluster whose Distributed Firewall is off, and the cluster’s DFW can’t be turned off while IDS/IPS is on. The lab blocks both and tells you why.
- IDS/IPS only sees what the firewall allowed. A firewall drop happens first, so IDS/IPS never inspects that traffic.
The diagram shows the state at a glance. VMs get a shield when the DFW is on, and a green shield with a tick when IDS/IPS is on too. Gateways show a GFW or GFW · IDS/IPS badge.
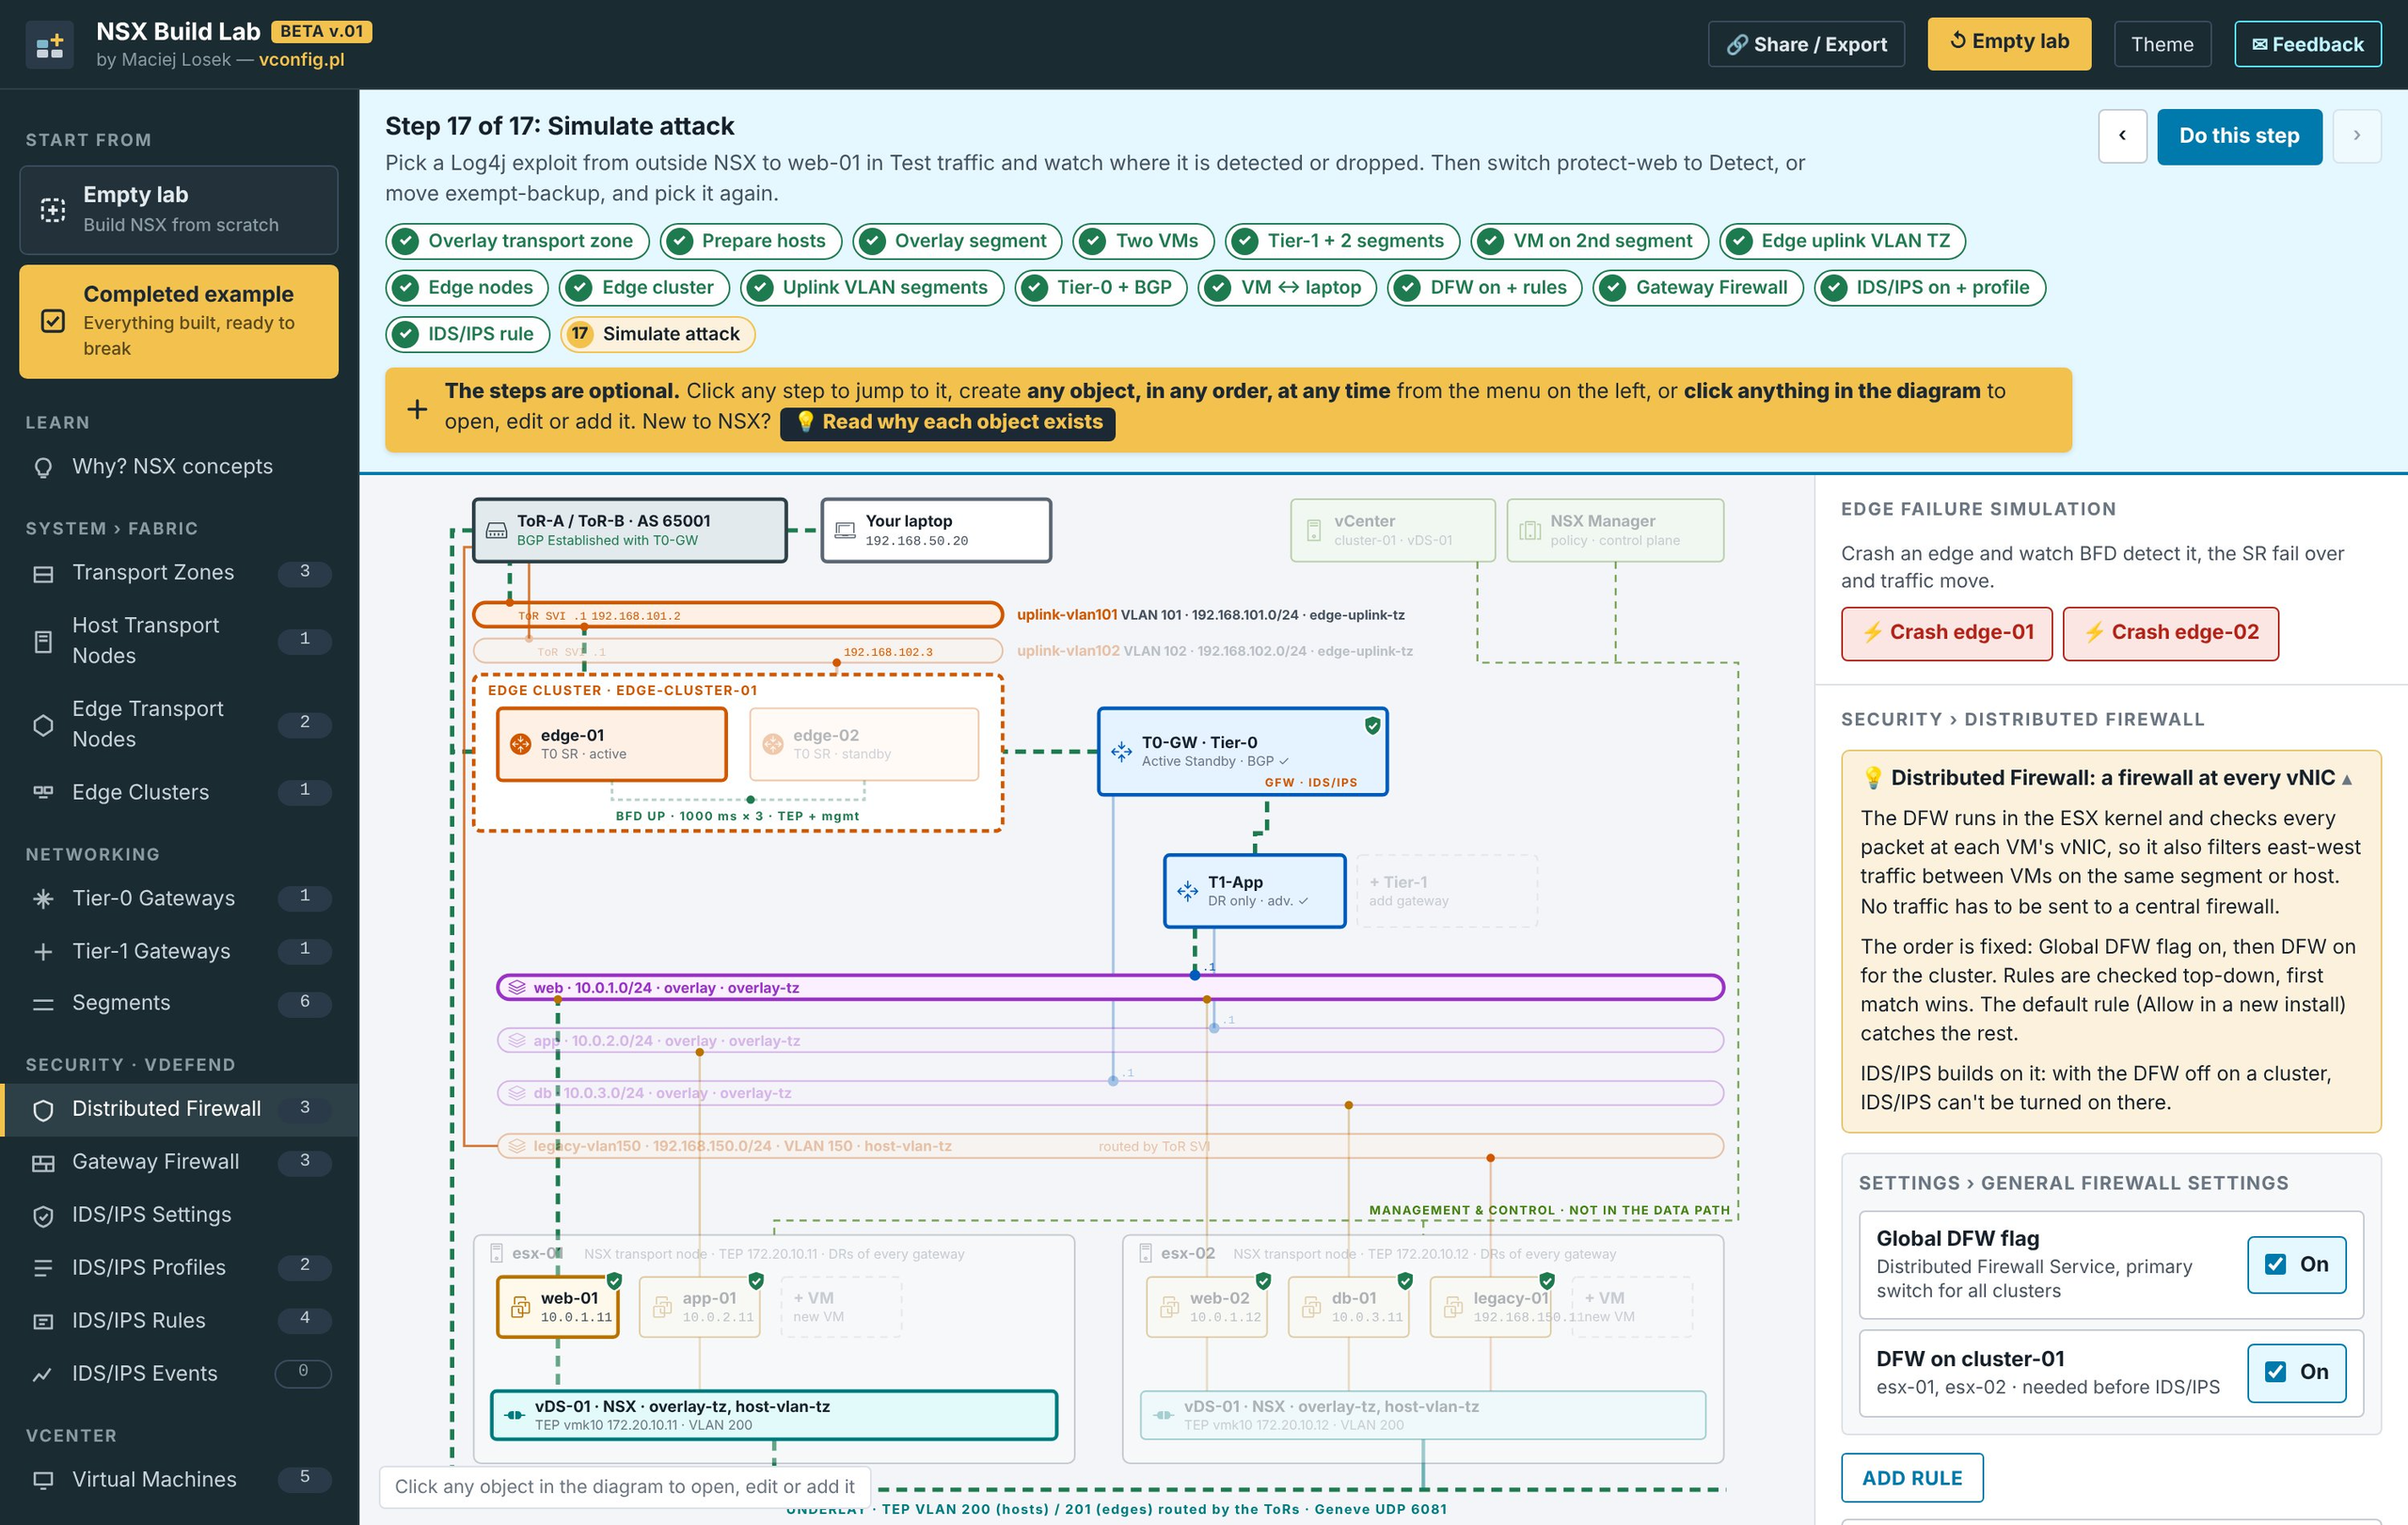
The Security · vDefend menu on the left, the Distributed Firewall page on the right, and shields on every VM in the diagram.
Every new page has a “Why?” box, like the rest of the lab, explaining why the object exists and when you need it.
Test traffic: routing, services and attacks in one card
The old “Can it reach?” card is now Test traffic. You pick a source, a destination and what to send, and one trace shows the routing hops and every security check on the way.
The traffic dropdown appears once the DFW or the Gateway Firewall is on. Until then the card works exactly like before.
- Any traffic · routing check (the default): the old two-way reachability test.
- Normal traffic: HTTP, HTTPS, SSH admin login, MySQL query, backup stream.
- Attacks: Log4j exploit (CVE-2021-44228), SQL injection, MySQL auth bypass, SSH brute force, port scan.
The security checks sit in the trace where they really happen. The Gateway Firewall and Gateway IDS/IPS lines come right after “T0-GW SR on edge-01”. The DFW and Distributed IDS/IPS lines come at the VM’s vNIC. They are marked with a diamond so they stand out from the routing hops, and the trace stops where the packet is dropped.
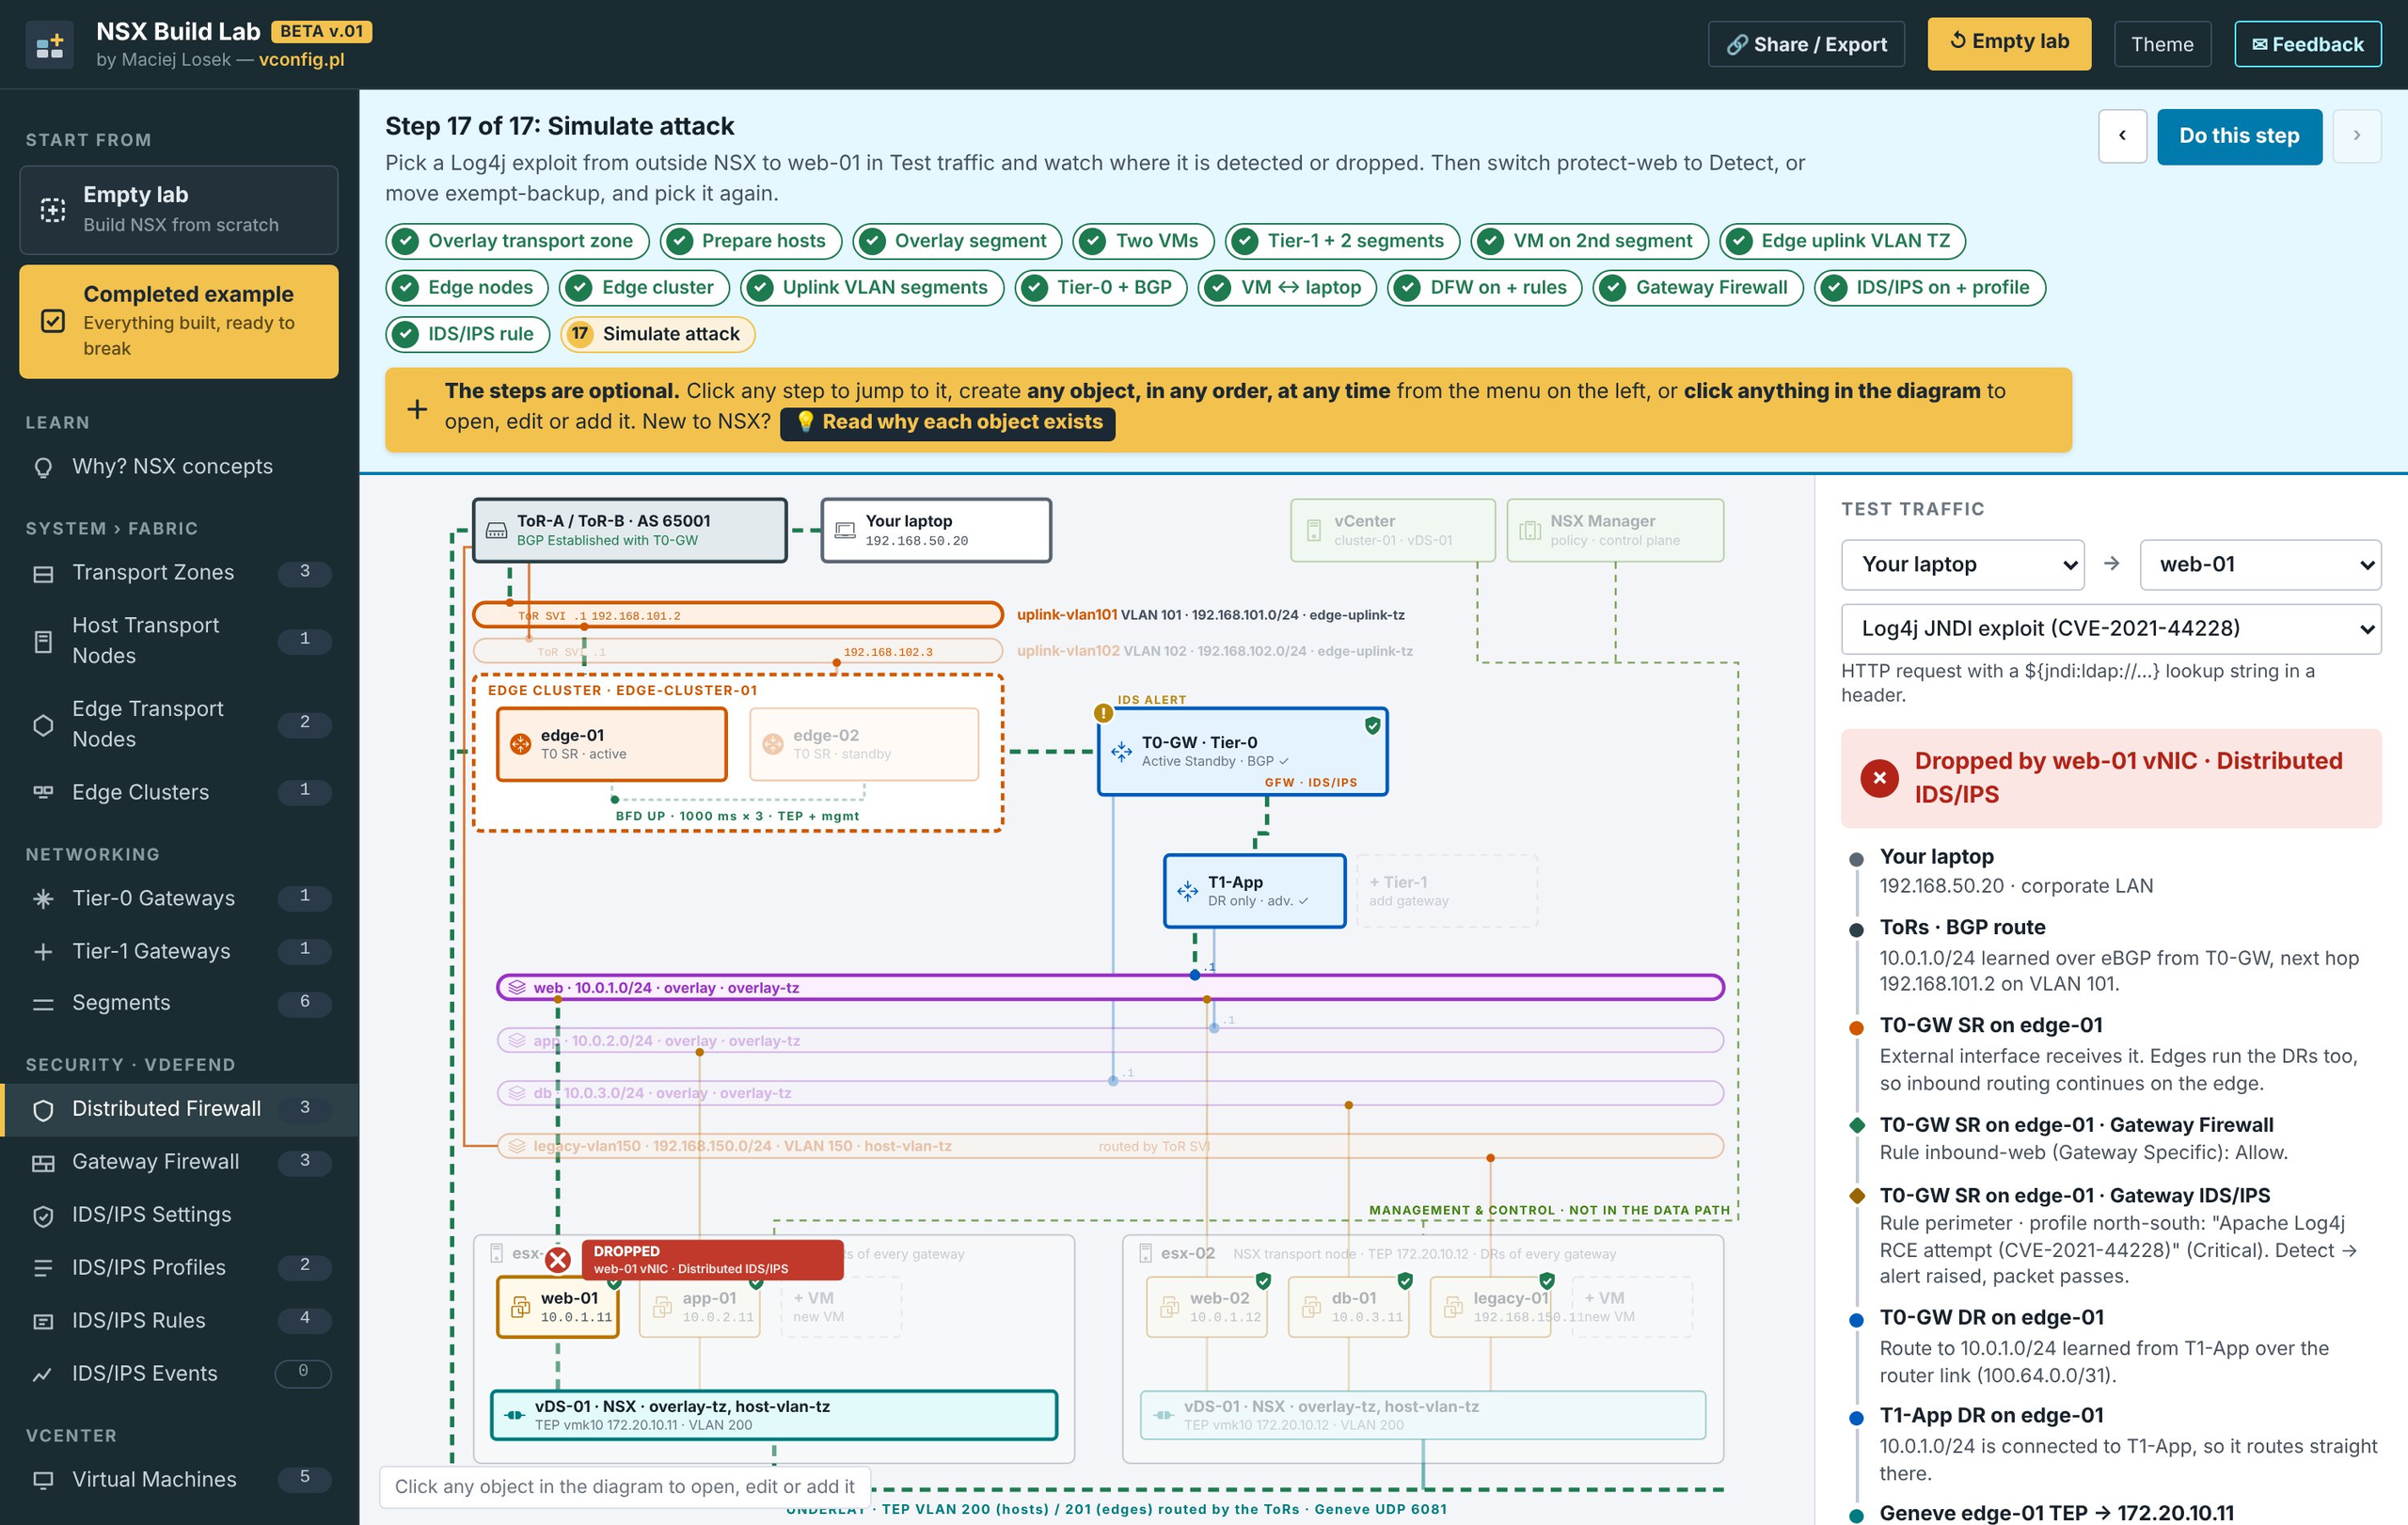
Log4j from the laptop to web-01: an IDS alert on T0-GW, then DROPPED at web-01’s vNIC by the Distributed IDS/IPS.
The verdict tells you the outcome in one line:
| Verdict | Colour | Meaning |
|---|---|---|
| Allowed both ways | Green | Routed, and nothing on the path blocked it |
| Delivered · IDS/IPS alert raised | Orange | A Detect rule matched: you know, but the packet got through |
| Delivered · the attack went unnoticed | Orange | Nothing inspected it, or the profile didn’t include that severity |
| Blocked by … / Dropped by … | Red | A firewall rule or a Detect and Prevent rule stopped it |
| Not reachable | Red | A routing problem, with the reason and a fix button |
The diagram marks the spot: a red DROPPED label where the packet stopped, or an orange IDS ALERT on the gateway or VM that raised it.
The reachability matrix follows the chosen traffic. Pick SSH, and you see at a glance which pairs a firewall blocks: ✓ allowed, ⛔ blocked by a firewall or IPS, ! IDS/IPS alert, ✗ no route. Hover a ⛔ cell to see what blocked it.
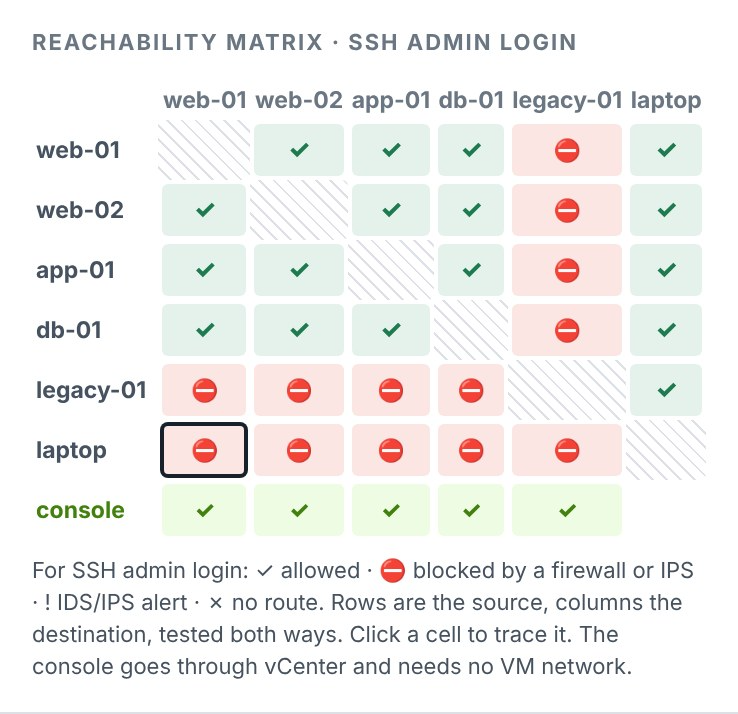
The matrix for SSH: the laptop can’t SSH into any VM, because the Gateway Firewall’s default Drop rule stops it on T0-GW. SSH to legacy-01 also crosses T0-GW and is blocked too. SSH between overlay VMs, and out to the laptop, is allowed.
Picking an attack sends it straight away and logs its events in IDS/IPS Events. Picking normal traffic logs nothing.
How to test it: five scenarios
Start from Completed example in the left menu. Everything is built: the DFW is on with three rules, the Gateway Firewall is on for T0-GW with its default rule set to Drop, and IDS/IPS is on for cluster-01 and for T0-GW.
1. A Log4j exploit from outside
- In Test traffic, pick Your laptop → web-01 and the Log4j JNDI exploit.
- Read the trace. The Gateway Firewall allows it (rule inbound-web). The Gateway IDS/IPS spots it and raises an alert (rule perimeter, Detect). The DFW allows HTTP to web-01. The Distributed IDS/IPS drops it at web-01’s vNIC (rule protect-web, Detect and Prevent).
- Open IDS/IPS Events: two events, one alert and one drop.
That is a common real-world pattern: detect at the perimeter for visibility, and prevent close to the workload the vulnerability affects.
2. Detect versus Detect and Prevent
- Open IDS/IPS Rules, edit protect-web and change the action to Detect.
- Send the Log4j exploit again. The verdict turns orange: “Delivered · IDS/IPS alert raised”. You know about the attack, but it reached web-01.
- Change the rule back to Detect and Prevent.
3. Lateral movement between VMs
- Pick app-01 → db-01 and MySQL auth bypass.
- The DFW allows it, because app-to-db-mysql allows MySQL from app to db. The Distributed IDS/IPS raises an alert at app-01’s vNIC (rule watch-east-west, Detect).
This traffic never passes an edge, so a perimeter IDS would never see it. Only the distributed one, running on every host, catches it.
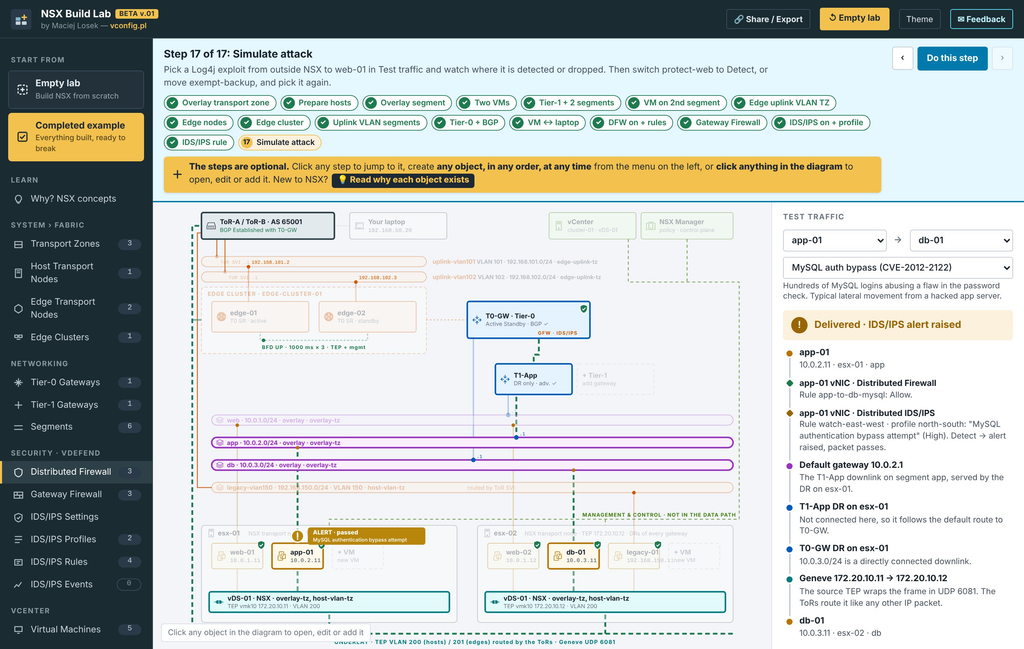
app-01 → db-01: the DFW allows MySQL, and the Distributed IDS/IPS raises an alert at app-01’s vNIC.
4. An Exempt rule that is too broad
- Pick app-01 → web-01 and Backup stream. Rule exempt-backup skips inspection, which saves CPU on a large, trusted flow.
- Now edit exempt-backup and set its service to Any.
- Send the Log4j exploit from your laptop to web-01 again. The Gateway IDS/IPS still raises its alert, but at web-01 the Exempt rule wins because it sits above protect-web. The attack is never inspected there and gets through.
Rule order matters: an Exempt rule above everything else switches IDS/IPS off for the traffic it matches.
5. Break BGP with the Gateway Firewall
- Open Gateway Firewall. T0-GW is selected, and rule 1 is allow-bgp-bfd (Pre Rules): ToR SVIs → T0 uplinks, BGP (TCP 179) + BFD (UDP 3784), Allow.
- Click Delete on that rule. BGP from the ToRs now hits the default rule, which is Drop.
- Watch it break. The ToRs lose BGP, T0-GW turns red with “BGP not established”, and the step bar jumps back to step 11. Test traffic from your laptop to web-01 says the ToRs have no route to 10.0.1.0/24, because the Gateway Firewall drops BGP.
- Fix it with the Open Gateway Firewall (T0-GW) button: add the rule back in Pre Rules, with the same sources, destinations and service.
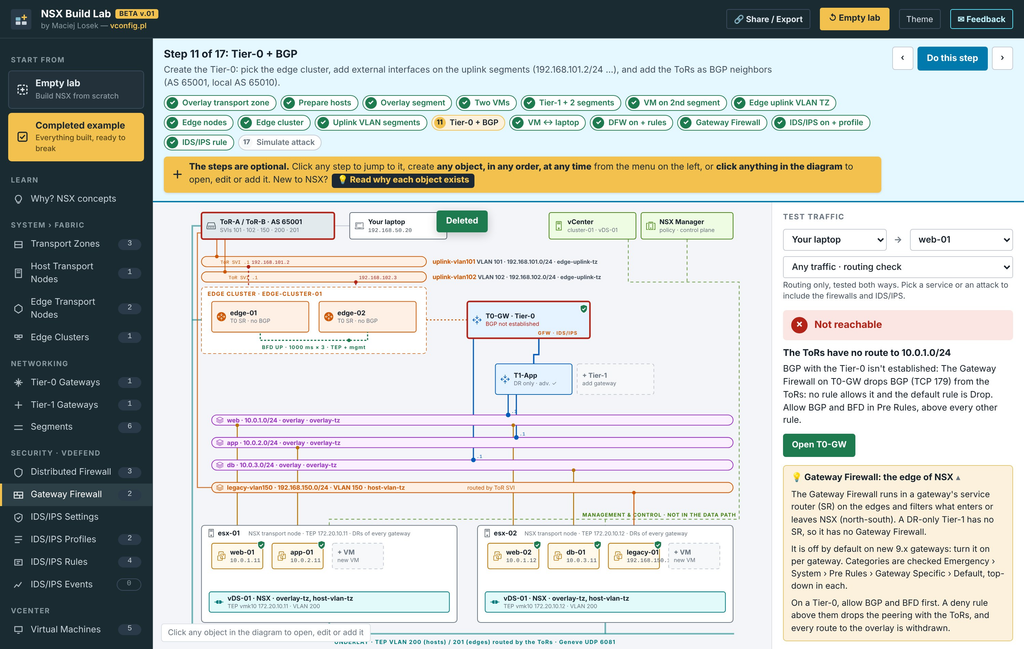
After deleting allow-bgp-bfd: T0-GW shows “BGP not established” and the laptop can’t reach web-01.
Setting the default rule to Allow also brings BGP back, but then the edge lets everything through.
Share / Export and Feedback
Share / Export now carries the security setup too. One link holds your whole lab, firewall rules, IDS/IPS profiles and rules included. You can also export it to a file and import it later. Build something broken and send it to a colleague as a puzzle: “find out why web-01 can’t reach db-01”. IDS/IPS events stay in your browser and aren’t part of the link.
Feedback is a new button at the top right. Pick Idea, Bug or Just saying thanks, write a few words and press Send: the message comes straight to me. You can add your e-mail if you’d like a reply, and a link to your current lab so I can see exactly what you saw.
What it is and what it isn’t
It’s a simulation, not a real NSX. Not every option from the NSX Manager is there, but the logic is: rule order, what needs what, and where each check happens.
- Profiles filter by severity only. Attack types, CVSS and affected products are shown but not used.
- The signature counts and the signature version are made up for the lab, and labelled “simulated”.
- The attack samples are fixed. You can’t write your own signatures.
- Test traffic and the matrix are separate from the routing check: “Any traffic” tests routing only, while a service or an attack also goes through the firewalls and IDS/IPS.
- Malware Prevention, Identity Firewall, TLS inspection and Federation are not in the lab.
It’s still BETA. If something behaves differently, use the Feedback button.
https://vconfig.pl/nsxlab


