Learning Objectives
By the end of this article, you will:
- Use PowerCLI and Python to send data to and receive data from external REST APIs.
- Automate notifications and ticket creation with VMware scripting.
- Build workflows that bridge VMware and IT service management tools.
- Visualize multi-tool integration with an diagram.
My Personal Repository on GitHub
VMware Repository on GitHub
Prerequisites
- Completed Articles 1–8.
- PowerCLI, Python, and access to the external tool/API (e.g., ServiceNow, Slack, Jira).
- Network permissions for API access (outbound HTTP/S).
1. Why Integrate PowerCLI with External APIs?
Many organizations automate IT workflows by connecting VMware scripts to ticketing, chat, monitoring, or CI/CD tools. This allows:
- Automated incident response (e.g., open a ticket when a VM alert occurs).
- Real-time notifications to Slack, Teams, or email.
- Custom dashboards and cross-platform data pipelines.
2. PowerShell Example: Sending a Slack Notification from PowerCLI
Suppose you want to send a Slack alert when a VM is powered off.
Step 1: Get Your Slack Webhook URL
- Create an incoming webhook in your Slack workspace.
Step 2: PowerShell Code to Post a Message
# Power off a VM and send a Slack alert if successful
$vmName = "<your-vm-name>"
$webhookUrl = "<your-slack-webhook-url>"Stop-VM -VM $vmName -Confirm:$false
$message = @{
text = "VM $vmName has been powered off via automation."
} | ConvertTo-Json
Invoke-RestMethod -Uri $webhookUrl -Method Post -ContentType 'application/json' -Body $message
3. Python Example: Creating a Jira Ticket from a PowerCLI Script
Suppose your automation needs to open a Jira ticket if a VM fails to snapshot.
Step 1: PowerShell Script to Attempt a Snapshot and Output Result
Save as snapshot_status.ps1:
$vmName = "<your-vm-name>"
$outputFile = "C:Tempsnap_status.txt"try {
New-Snapshot -VM $vmName -Name "AutomatedSnapshot" -ErrorAction Stop
"SUCCESS" | Out-File -FilePath $outputFile -Encoding utf8
} catch {
"FAILED" | Out-File -FilePath $outputFile -Encoding utf8
}
Step 2: Python Script to Read Result and Call Jira API
import requestsstatus_file = r"C:Tempsnap_status.txt"
with open(status_file, "r") as f:
status = f.read().strip()
if status == "FAILED":
url = "https://<your-jira-server>/rest/api/2/issue/"
auth = ('<jira-username>', '<jira-api-token>')
headers = {"Content-Type": "application/json"}
data = {
"fields": {
"project": {"key": "IT"},
"summary": "VM Snapshot Failure - Automated",
"description": "Snapshot failed during automation run for VM.",
"issuetype": {"name": "Task"}
}
}
r = requests.post(url, json=data, auth=auth, headers=headers)
print("Jira Ticket Created:", r.status_code, r.json())
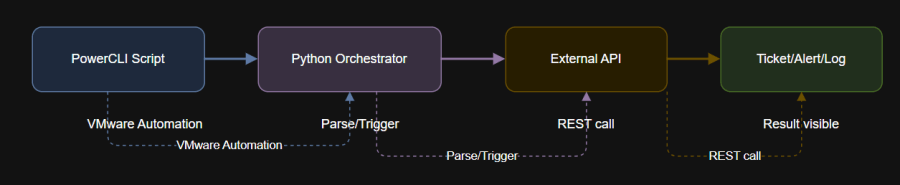
4. Diagram: Integration Workflow
5. Other Integration Ideas
- Post VM inventory reports to Teams or email with attachments.
- Trigger Ansible/Terraform or other IT automation from VMware events.
- Sync inventory with asset management databases.
- Send critical vSphere alerts to on-call engineers automatically.
6. Troubleshooting Tips
- For REST API authentication issues, check token/username, endpoint, and permissions.
- Test your API calls with sample data before wiring to production automation.
- Use PowerShell’s
Invoke-RestMethodor Python’srequestsfor API interaction. - Review API documentation for required fields and quotas.
7. Further Reading
8. Conclusion and Next Steps
You now know how to connect your VMware automation to popular APIs and tools, unlocking workflows that bridge IT silos and speed up incident response.
Next up: Article 10 is your capstone project—combining everything you’ve learned into a robust, multi-step automation workflow with PowerCLI and Python.