
Updated: This article has been refreshed to cover the latest ways to edit documents on Ubuntu locally, highlighting ONLYOFFICE, LocalAI, GPT4All, and Ollama, and how they let you use AI for smart writing and content generation.
If you are looking for ways to edit documents on Ubuntu locally using your favourite AI tool as a smart writing assistant, you have several options to choose from.
For example, you can opt for ONLYOFFICE Desktop Editors, an open-source office suite for Linux, integrated with such AI platforms as LocalAI and GPT4All.
Both services let you install your favourite LLM and use its capabilities for local document editing within the ONLYOFFICE package.
However, if you don’t like LocalAI and GPT4All, and need an alternative, there is another AI platform that can give you access to a wide variety of modern and powerful AI tools in combination with ONLYOFFICE Desktop Editors.
What it involves is Ollama, an open-source AI platform designed to run LLMs locally on your Linux machine.
Step 1: Install ONLYOFFICE Desktop Editors on Ubuntu
Let’s get started with installing ONLYOFFICE Desktop Editors on Ubuntu, which is an open-source office package for Linux and other OS that features editors for text documents, spreadsheets, presentations, PDF forms and PDF files.
This program provides native support for Word, Excel and PowerPoint files, which makes it a decent alternative to MS Office for Linux users.
The most efficient way to get ONLYOFFICE Desktop Editors installed on Ubuntu is to add its repository and then add the GPG key:
mkdir -p -m 700 ~/.gnupg
gpg --no-default-keyring --keyring gnupg-ring:/tmp/onlyoffice.gpg --keyserver hkp://keyserver.ubuntu.com:80 --recv-keys CB2DE8E5
chmod 644 /tmp/onlyoffice.gpg
sudo chown root:root /tmp/onlyoffice.gpg
sudo mv /tmp/onlyoffice.gpg /usr/share/keyrings/onlyoffice.gpg
Secondly, you need to add the app’s repository:
echo 'deb [signed-by=/usr/share/keyrings/onlyoffice.gpg] https://download.onlyoffice.com/repo/debian squeeze main' | sudo tee -a /etc/apt/sources.list.d/onlyoffice.list
Thirdly, let’s update the package manager cache by running this:
sudo apt-get update
Finally, let’s finish the installation process:
sudo apt-get install onlyoffice-desktopeditors
Now you can run ONLYOFFICE Desktop Editor via the terminal:
desktopeditors
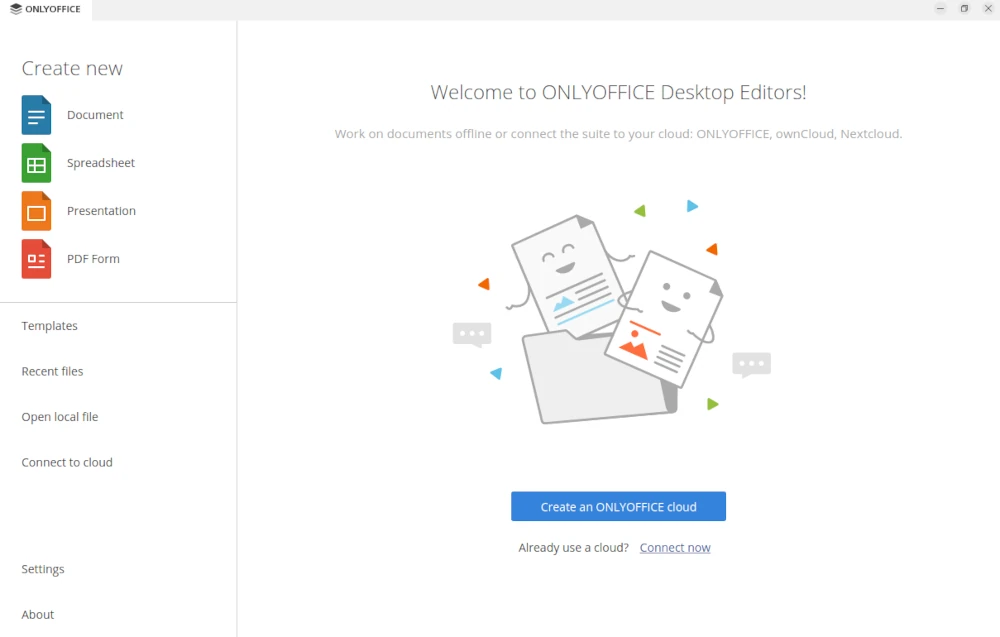
Using the start page, you can easily create new office files or open those stored locally on your Ubuntu machine.
If you prefer alternative installation methods for ONLYOFFICE Desktop Editors, there is a detailed guide at How to Install ONLYOFFICE Desktop Editors in Linux.
Step 2: Install Ollama and Run an AI Model Locally
The second step requires you to deploy Ollama on your Ubuntu machine and run one of its AI models.
It’s an open-source platform that provides easy access to plenty of AI chatbots that can be used for different purposes, from coding to content generation.
The biggest advantage of this platform is that it allows you to run and use AI models locally via the terminal.
When it comes to the required configuration of your hardware, the main issue is RAM. Some sophisticated AI models need at least 64GB of RAM.
However, there are some compact models that don’t require a lot of resources. The recommended minimum is 16 GB of RAM.
To install Ollama on Ubuntu, open the terminal and run this command:
curl -fsSL https://ollama.com/install.sh | sh
This command gets Ollama installed automatically, but there is also a manual installation method with additional packages and drivers for better performance.
If you would like to try this method, take a look at the Ollama documentation on GitHub.
When Ollama is installed, you can run it with the following command:
ollama serve
Everything is ready to run the first AI model. Please carefully browse the Ollama library and select what works well for you.
As an example, let’s run the deepseek-r1 model which might achieve performance comparable to OpenAI-o1.
To get this model running, enter the following command in the terminal:
ollama run deepseek-r1
After successful installation, you can send your requests to the chatbot via the terminal. Nevertheless, we will go further and use the installed model for document editing in ONLYOFFICE Desktop Editors.
Step 3: Install and Configure the AI Plugin in ONLYOFFICE Desktop Editors
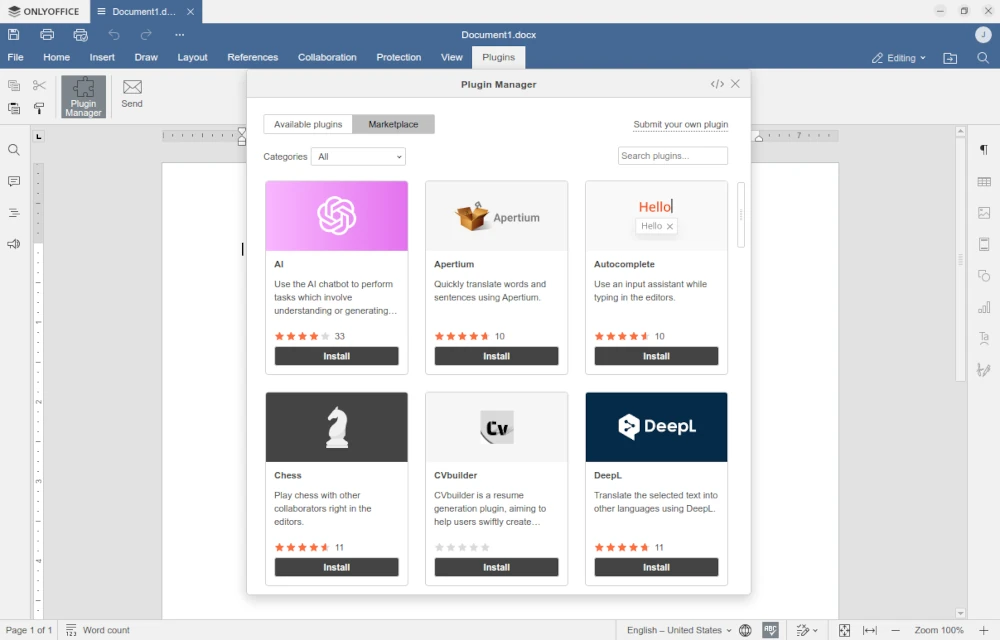
In ONLYOFFICE Desktop Editors, integration with third-party services and tools, including AI chatbots, works via plugins, which can be found in the Plugin Manager and from there you can access on the Plugins tab.
When you open the Plugin Manager, you will see the built-in plugin marketplace with different plugins, but you need to install the one called AI.
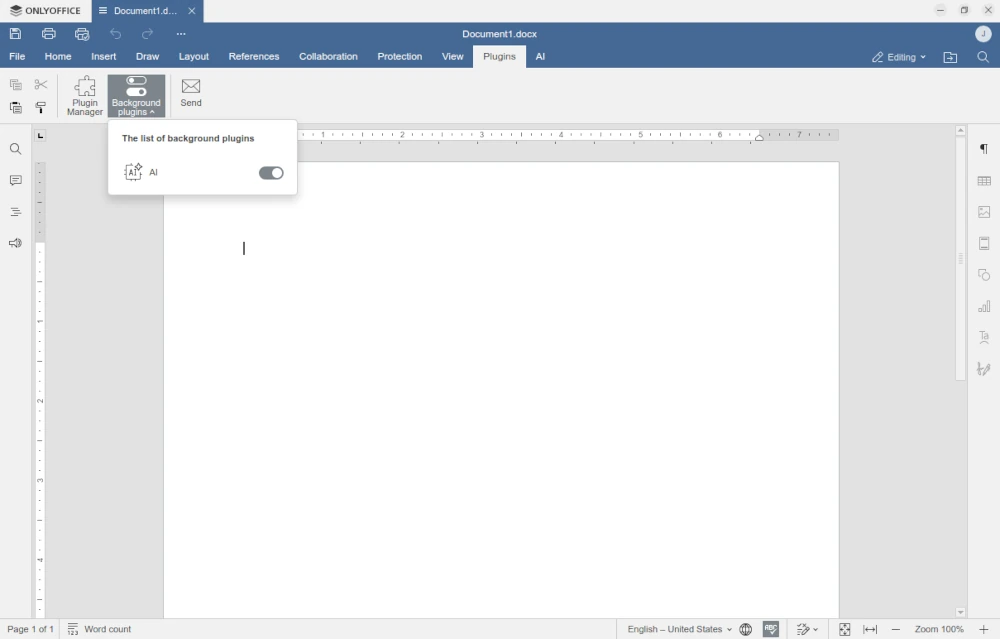
After installation, the plugin should be activated manually. You can do this by accessing the Background plugins menu on the Plugins tab and turning on the AI slider.
This action will activate the AI plugin, and you will see a new tab on the top toolbar. Using the newly added tab, you will be able to configure the plugin and add the Ollama model installed during the previous step.
When the AI plugin is activated, the only thing you need to do is to add your local IA model in its settings.
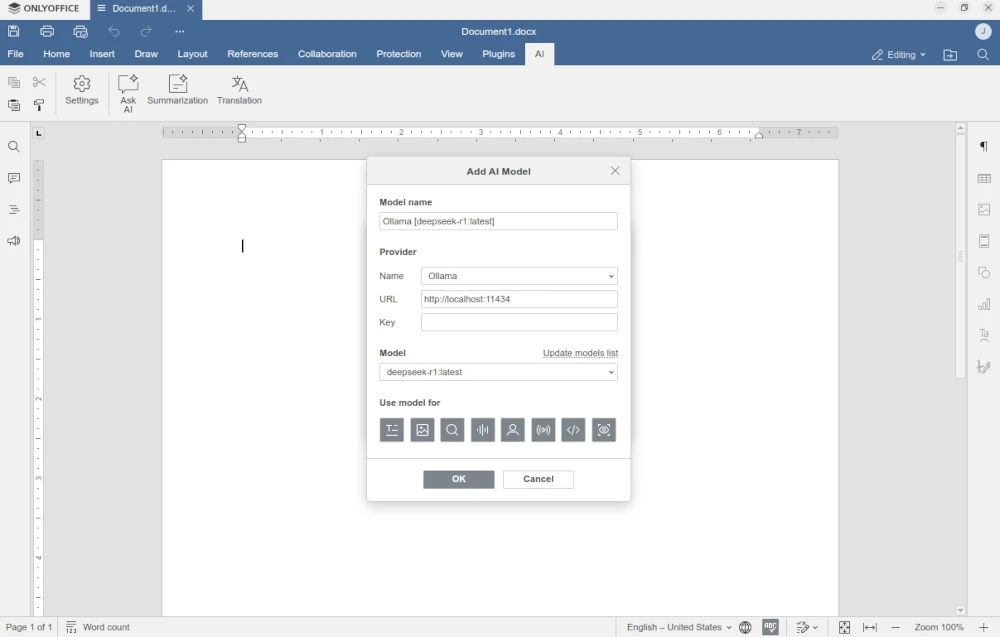
To do so, switch to the AI tab and click Settings. In the AI configuration window, click the Edit AI model and select Add.
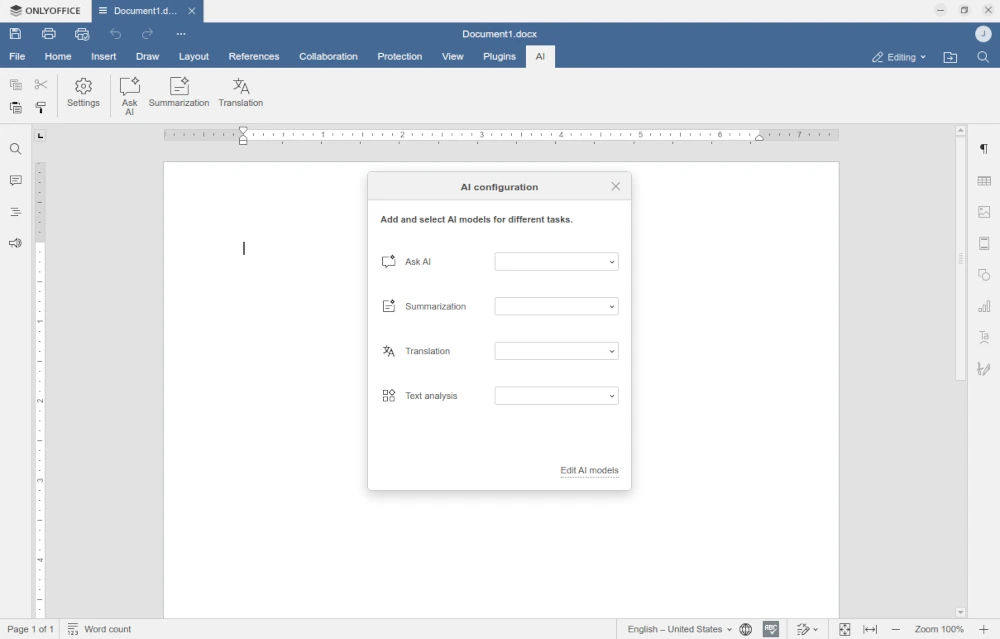
In the Add AI model window, you need to choose the desired AI provider. The default list includes several options, such as OpenAI, Mistral, Together AI, Anthropic, Groq, GPT4ALL, DeepSeek, Google Gemini and, of course, Ollama.
Select Ollama from the list and make sure the URL parameter is http://localhost:11434, which is the default parameter for the Ollama API.
The Key field should remain blank, and the Model field should specify deepseek-r1: latest. Click OK.
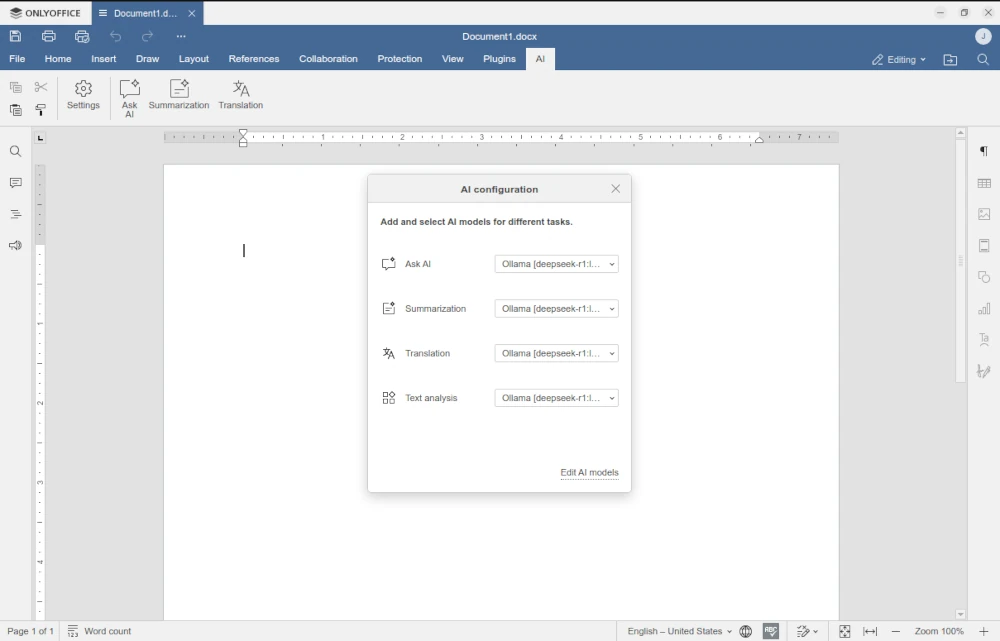
The final action is to set the added AI model as the preferred option for various tasks. Get back to the AI configuration menu and select your LLM for all available options, Ask AI, Summarization, Translation and Text analysis.
If you have other AI models, you can choose them where needed. This way, you can assign various tasks to certain models.
For example, one model can be used for translation work, and the other can deal with summaries.
Step 4. Start Using the AI Assistant While Editing Ddocuments
Now your AI assistant is ready to make your document editing experience pleasant. You can unleash your creativity and let the chatbot do routine work:
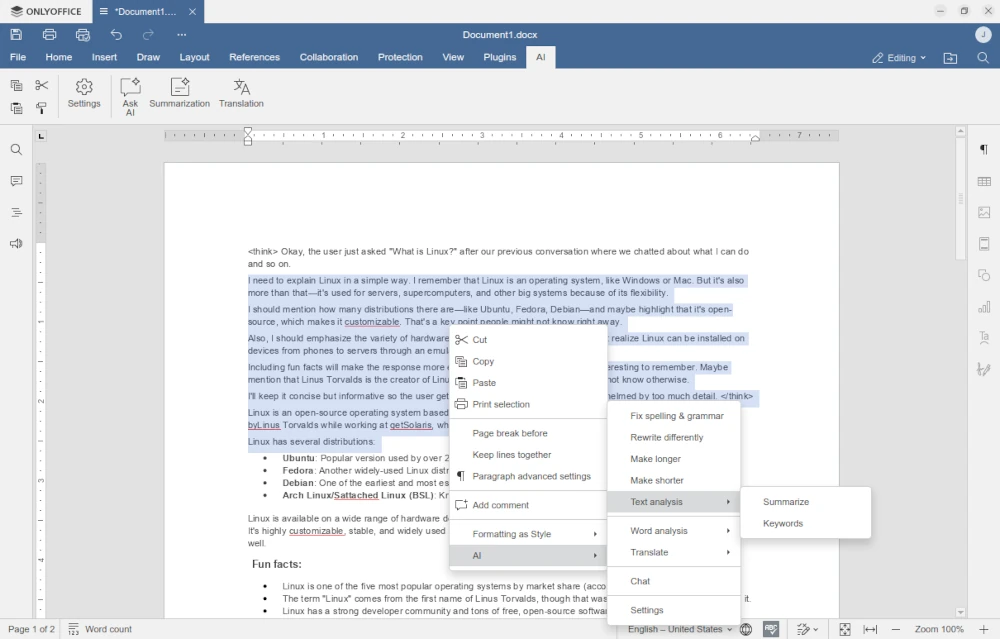
- Type your text and ask the AI to check it for grammar and spelling mistakes.
- Make your text longer or shorter or even rewrite it completely.
- Find the meanings of the words you don’t know.
- Check the definitions of words and nations.
- Let the AI generate new text content for you.
- Translate what you need without using online dictionaries.
- Chat with the AI assistant in a separate window and much more.
To access the AI features, use the options on the AI tab or the context menu.
Using Ollama, you can add some other available models in ONLYOFFICE Desktop Editors and check if they are better at what you need.
Conclusion
With the Ollama and ONLYOFFICE Desktop Editors integration, you get powerful AI tools that you can locally use to edit documents, spreadsheets, presentations and PDF files on your Ubuntu machine.
The main advantage of this combination is that you have total freedom and can choose any AI model you like. The only concern is the performance of your hardware since some LLMs consume a lot of resources. The more RAM you have, the better.
Now that you know how to enable AI-powered document editing on Ubuntu with ONLYOFFICE Desktop Editors and Ollama, don’t hesitate to share your feedback and thoughts.


